Set up Claude, Cursor and Gemini in Codalio Studio
Codalio Studio is the desktop app for working on your project's code. Its AI sessions run the coding tools already on your computer, such as Claude Code, Cursor Agent and Gemini CLI. Studio doesn't bundle them, so you install the ones you want once, sign in once, and Studio picks them up.
This guide takes you from a computer with none of them installed to your first AI session. If you already have a tool installed, skip to Confirm it works.
The screenshots are from Codalio Studio on Windows. The screens are the same on macOS and Linux apart from the window controls and the terminal prompt.
Supported tools
Studio works with these command-line tools. The name in the second column is the command you type in a terminal.
| Tool | Command |
|---|---|
| Claude Code | claude |
| Cursor Agent | cursor-agent (also agent) |
| Gemini CLI | gemini |
| Codex CLI | codex |
| Grok CLI | grok |
| OpenCode | opencode |
| Aider | aider |
| Ollama | ollama |
| llm | llm |
You only need one to get started. You can install several and switch between them.
1. See what Studio finds
The first time you open Studio, it asks you to Pick your default agent. Studio looks through your computer and sorts the tools into Detected on your system and Not installed.
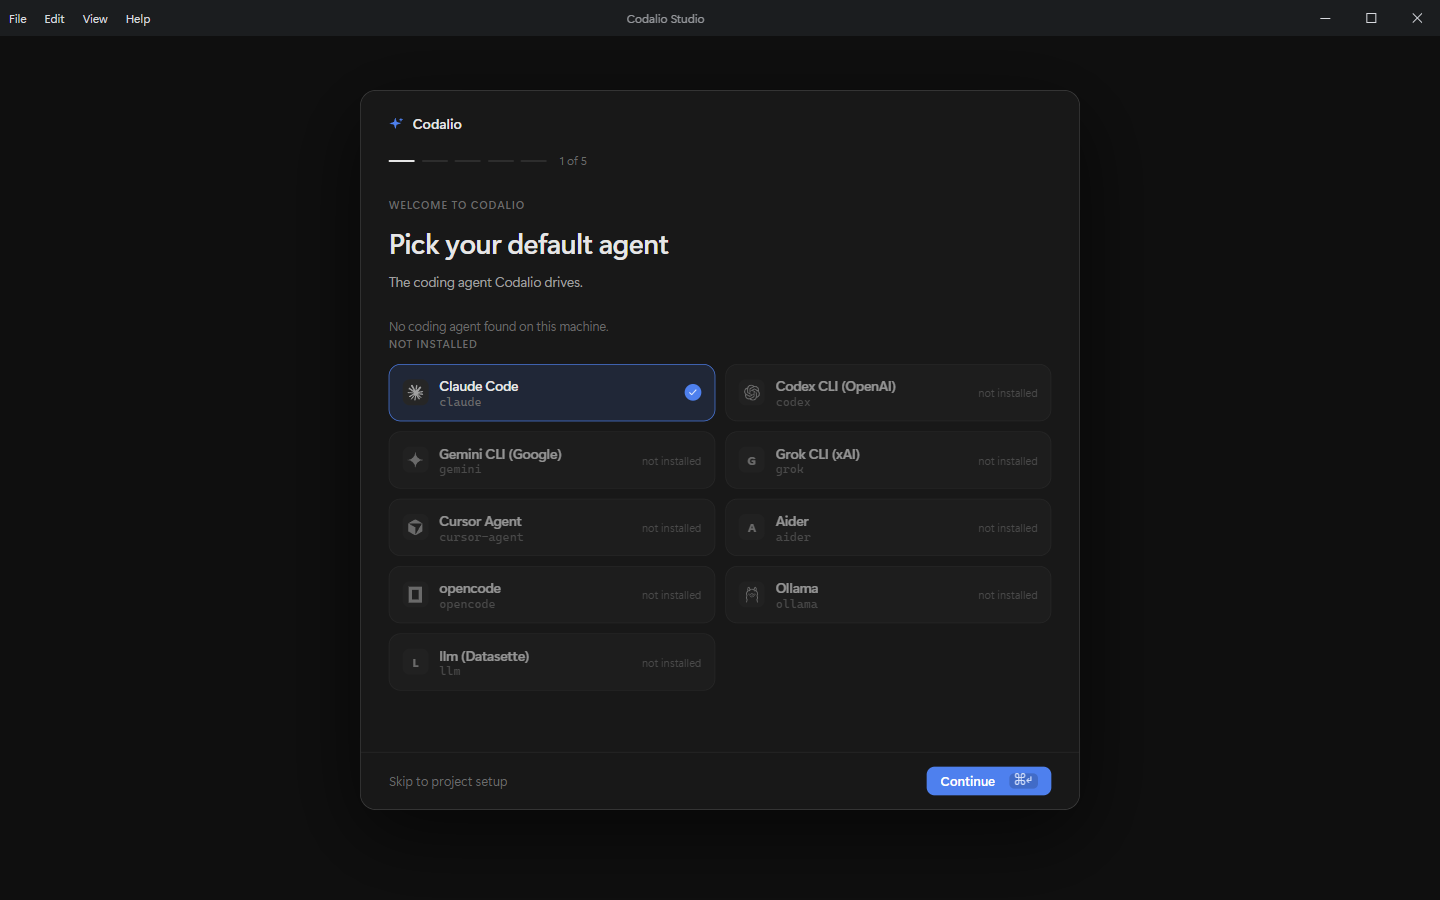
Choose the tool you want to use and click Continue. If it isn't installed yet, the next screen shows you how to install it.
2. Install a tool
The Set up your tools screen shows the install steps for the tool you chose:
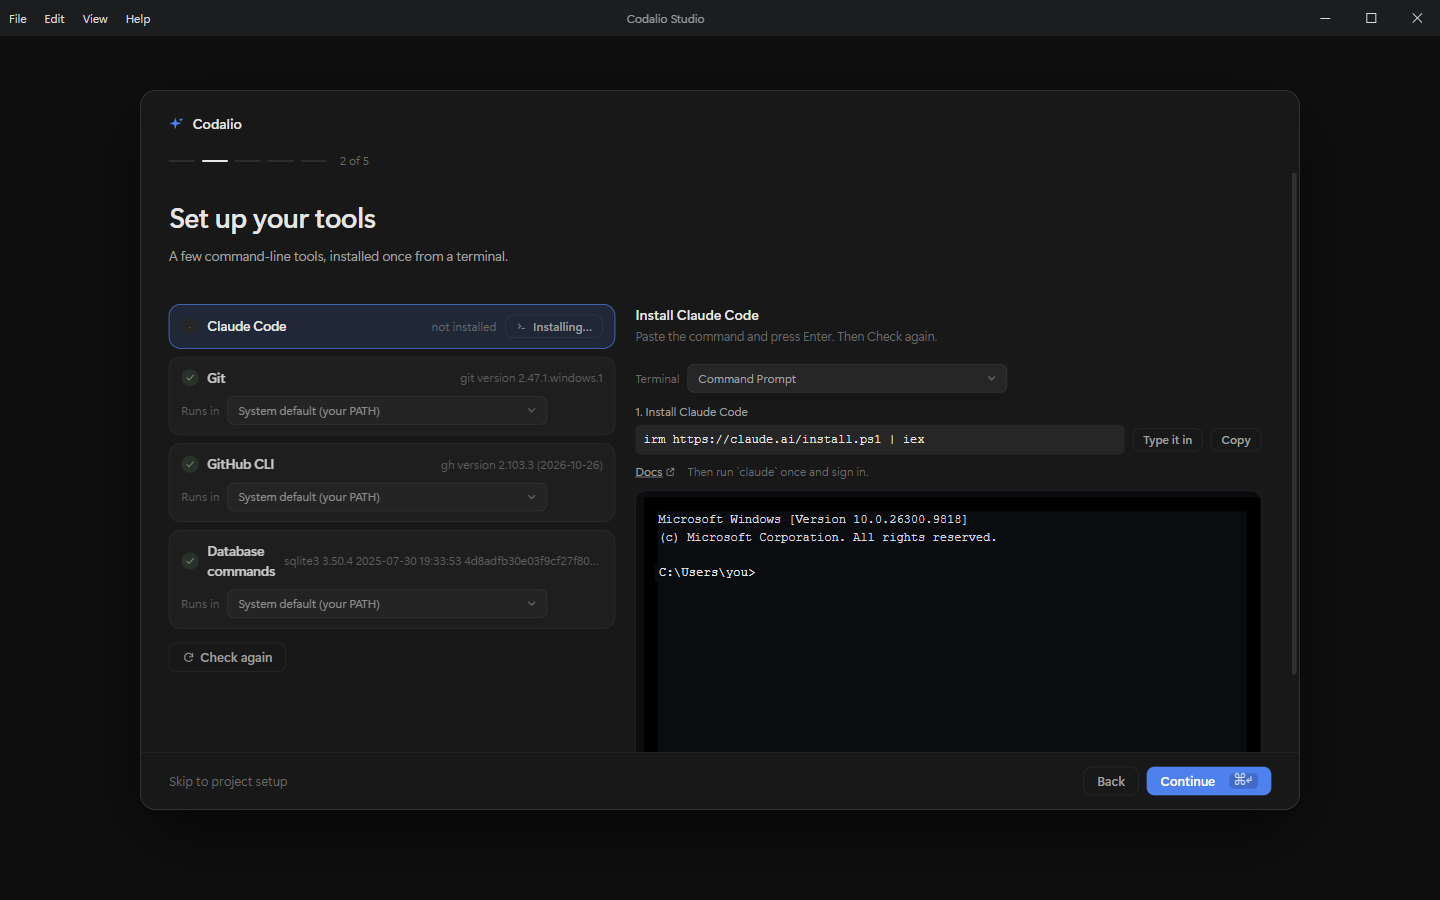
- Pick the Terminal to install from. On Windows, choose Windows PowerShell for the Claude Code, Grok and Ollama commands, which are PowerShell commands.
- For each step, click Type it in to put the command into the terminal below, or Copy to paste it somewhere yourself.
- Press Enter in the terminal to run it. Studio never runs an install for you.
- When the install finishes, click Check again. The tool's row turns green when Studio finds it.
Studio can also install the tools it relies on, such as Git and the GitHub CLI, the same way.
The install commands
These are the commands Studio shows. Run them in a terminal on your computer.
macOS, Linux and WSL
# Claude Code
curl -fsSL https://claude.ai/install.sh | bash

# Cursor Agent
curl https://cursor.com/install -fsS | bash

# Gemini CLI (needs Node.js)
npm install -g @google/gemini-cli

# Codex CLI (needs Node.js)
npm install -g @openai/codex

# OpenCode
curl -fsSL https://opencode.ai/install | bash

# Grok CLI
curl -fsSL https://x.ai/cli/install.sh | bash

# Aider
python3 -m pip install aider-install && aider-install
Windows (PowerShell)
# Claude Code
irm https://claude.ai/install.ps1 | iex

# Gemini CLI (needs Node.js)
npm install -g @google/gemini-cli

# Codex CLI (needs Node.js)
npm install -g @openai/codex

# OpenCode
npm install -g opencode-ai

# Grok CLI
irm https://x.ai/cli/install.ps1 | iex

# Aider
python -m pip install aider-install && aider-install
Node.js, needed for the npm installs above:
# macOS (with Homebrew)
brew install node

# Ubuntu, Debian and WSL
sudo apt-get update && sudo apt-get install -y nodejs npm
# Windows
winget install --id OpenJS.NodeJS.LTS -e
Ollama and llm run models on your own computer:
# Ollama: macOS
brew install --cask ollama
# Ollama: Linux
curl -fsSL https://ollama.com/install.sh | sh
# llm: macOS
brew install llm
# llm: Linux
python3 -m pip install llm
# Windows
winget install --id Ollama.Ollama -e
python -m pip install llm
After installing Ollama, download a model, for example ollama pull llama3.
Cursor Agent on Windows
Cursor Agent has no one-line installer for Windows terminals. Studio says so on the install screen and links to Cursor's installation guide.
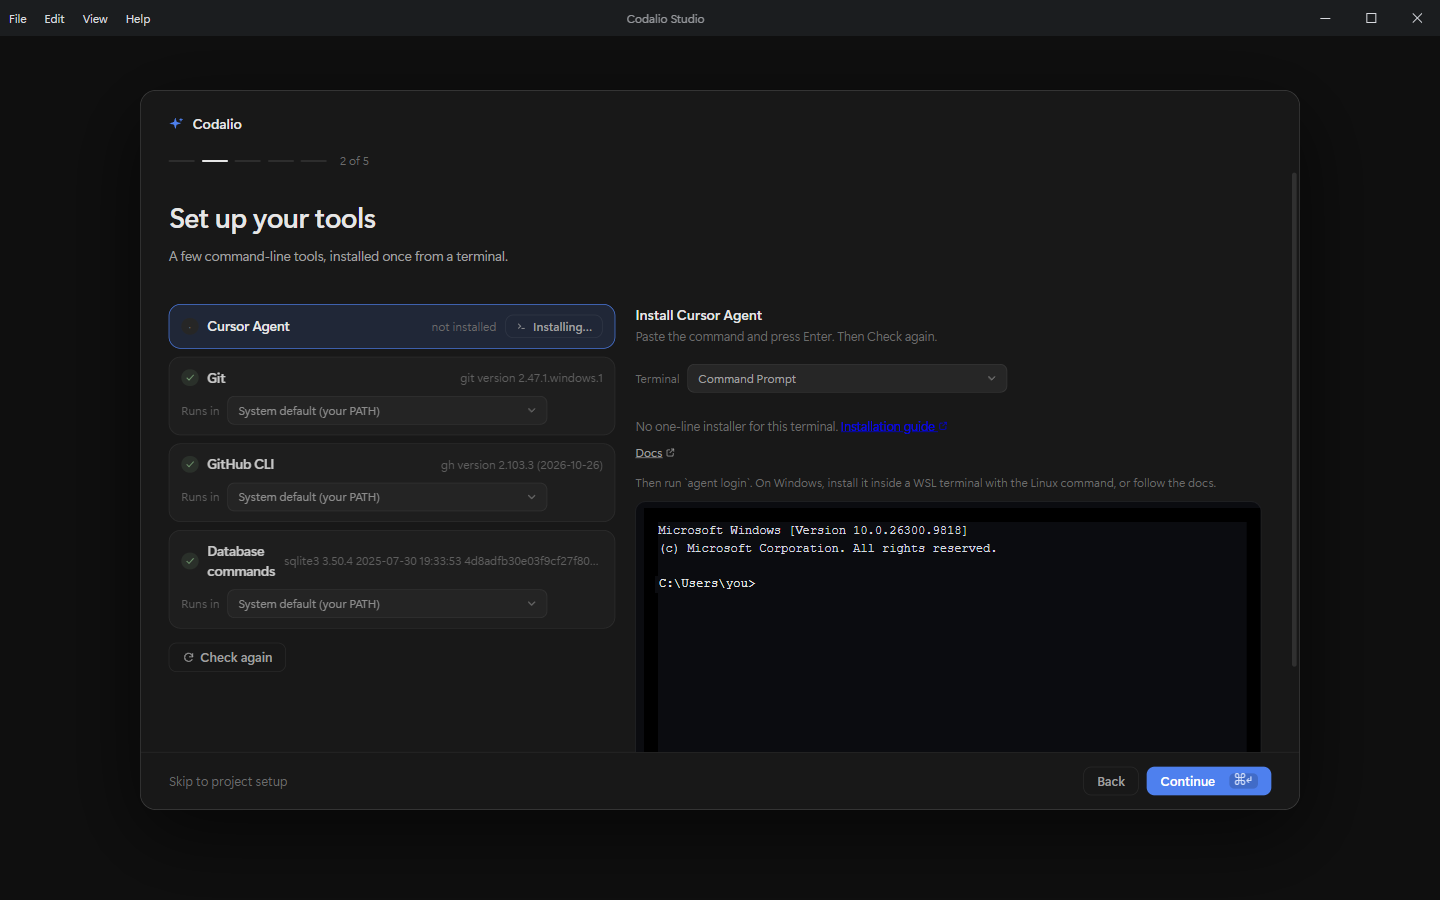
The simplest route is to install it inside WSL with the Linux command above. Studio can run tools in WSL, so you can still use it from Studio. See Choose where a tool runs.
3. Sign in
Each tool keeps its own login. Run its sign-in command once in a terminal, and finish the sign-in in the browser window that opens.
| Tool | Sign in |
|---|---|
| Claude Code | claude auth login |
| Cursor Agent | agent login (or cursor-agent login) |
| Codex CLI | codex login, with your ChatGPT account |
| OpenCode | opencode auth login |
| Gemini CLI | Run gemini and sign in with your Google account |
| Grok CLI | Run grok and sign in |
Ollama needs no sign-in. Aider and llm use an API key from the model provider you choose. See their own documentation for how to set one.
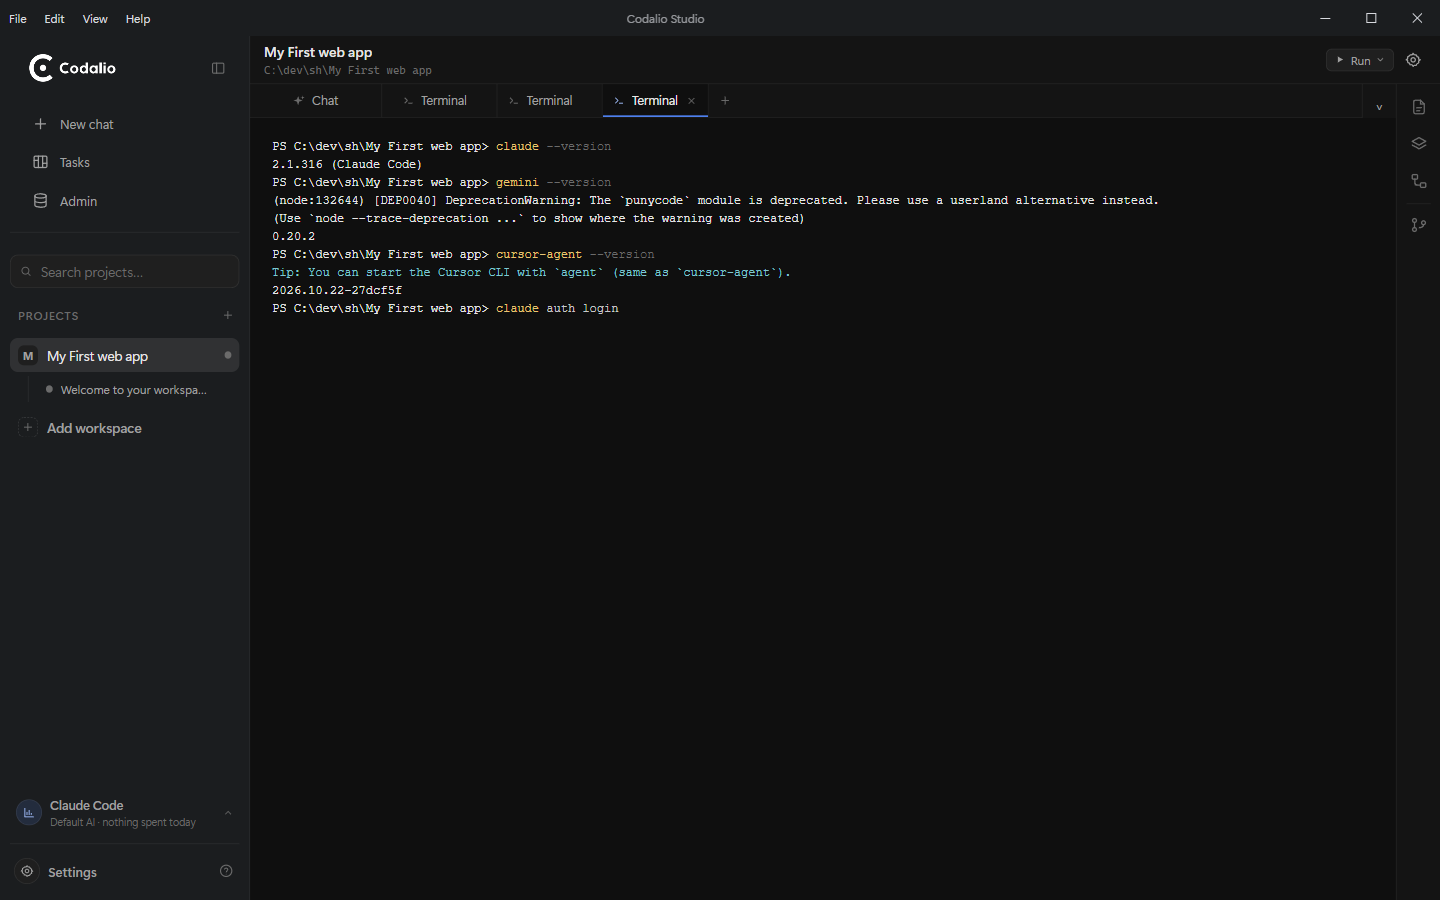
You can open a terminal inside Studio for this: click + in the tab bar, then choose Terminal. See Start a session.
Confirm it works
In a terminal, ask each tool for its version. A version number means it is installed and on your path.
claude --version
gemini --version
cursor-agent --version
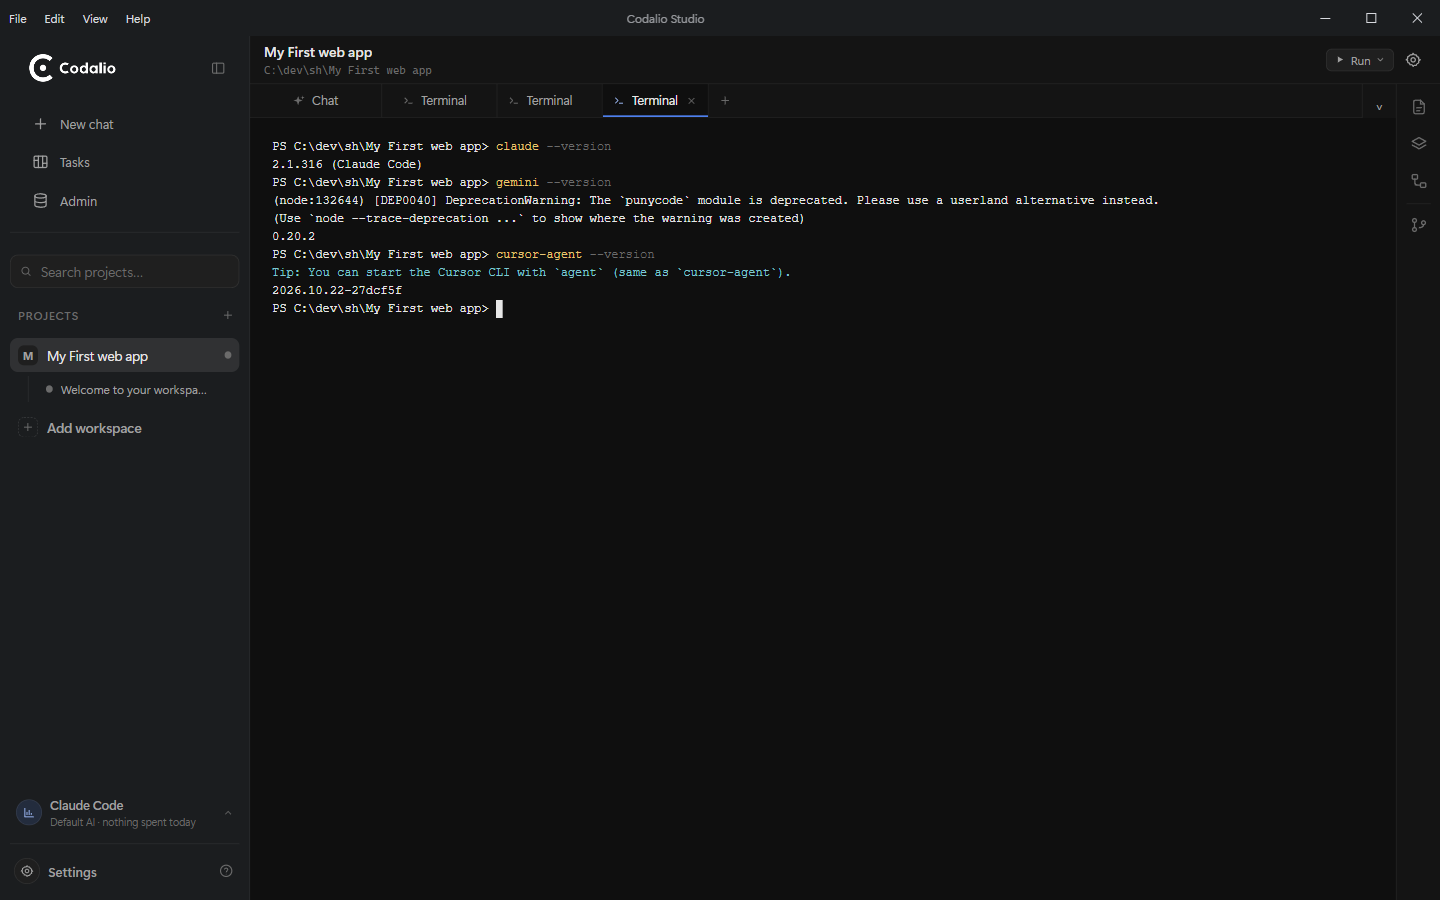
If a command isn't recognized, see Troubleshooting.
Choose which tool Studio uses
Studio uses one tool by default for each workspace, and you can start a session with a different one at any time.
To change the default:
- Open Workspace settings with the gear icon at the top right of the workspace.
- Choose AI.
- Under Provider, choose Local AI: a coding CLI on this machine, or a custom command.
- Under Engine, choose the tool.
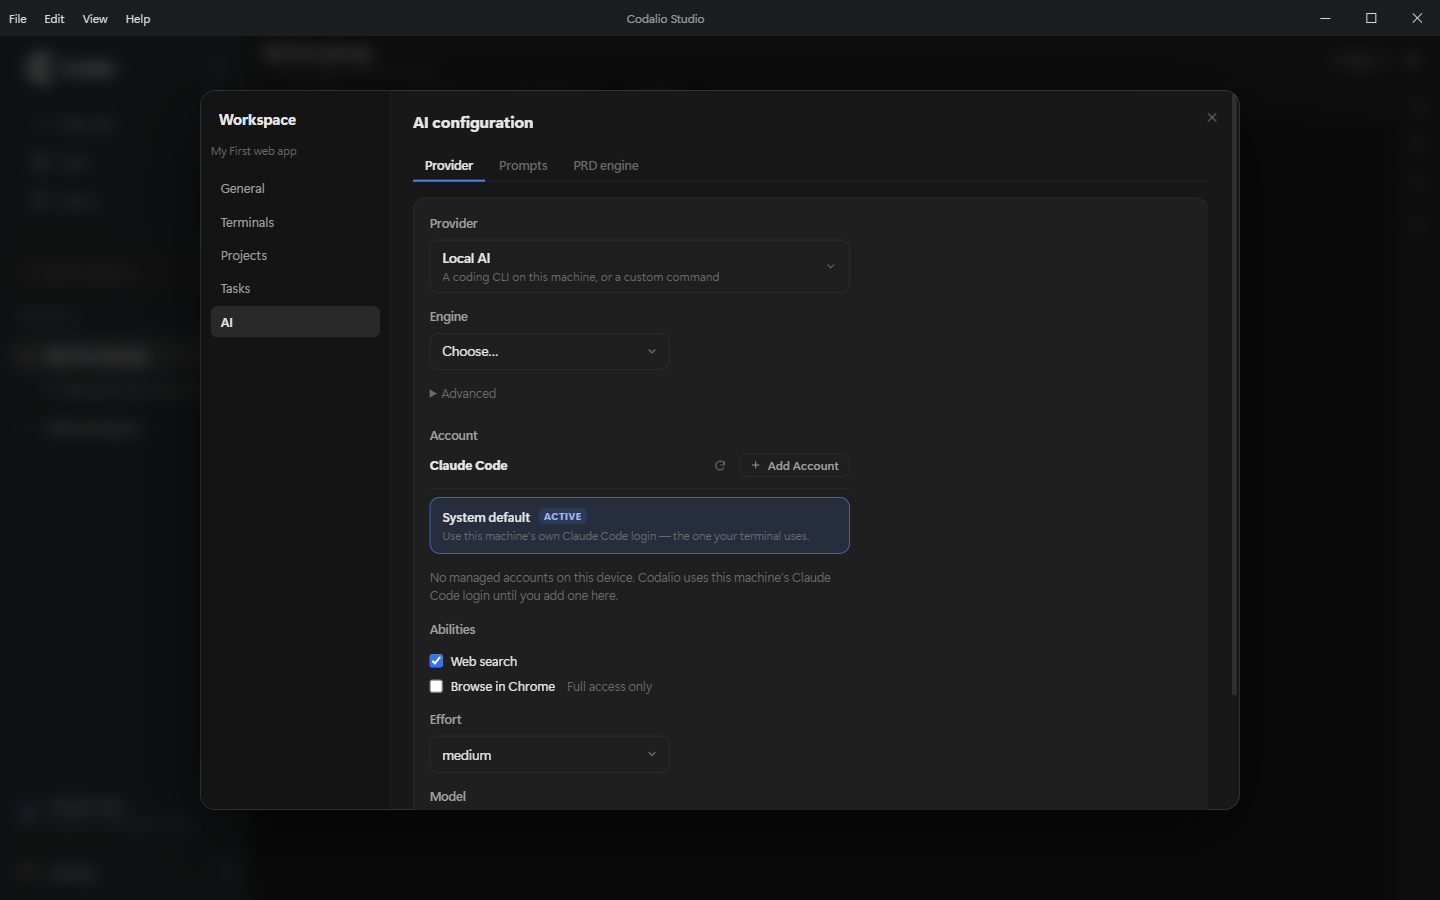
If you'd rather use a model through your own API key, choose a different provider here instead of Local AI.
Choose where a tool runs
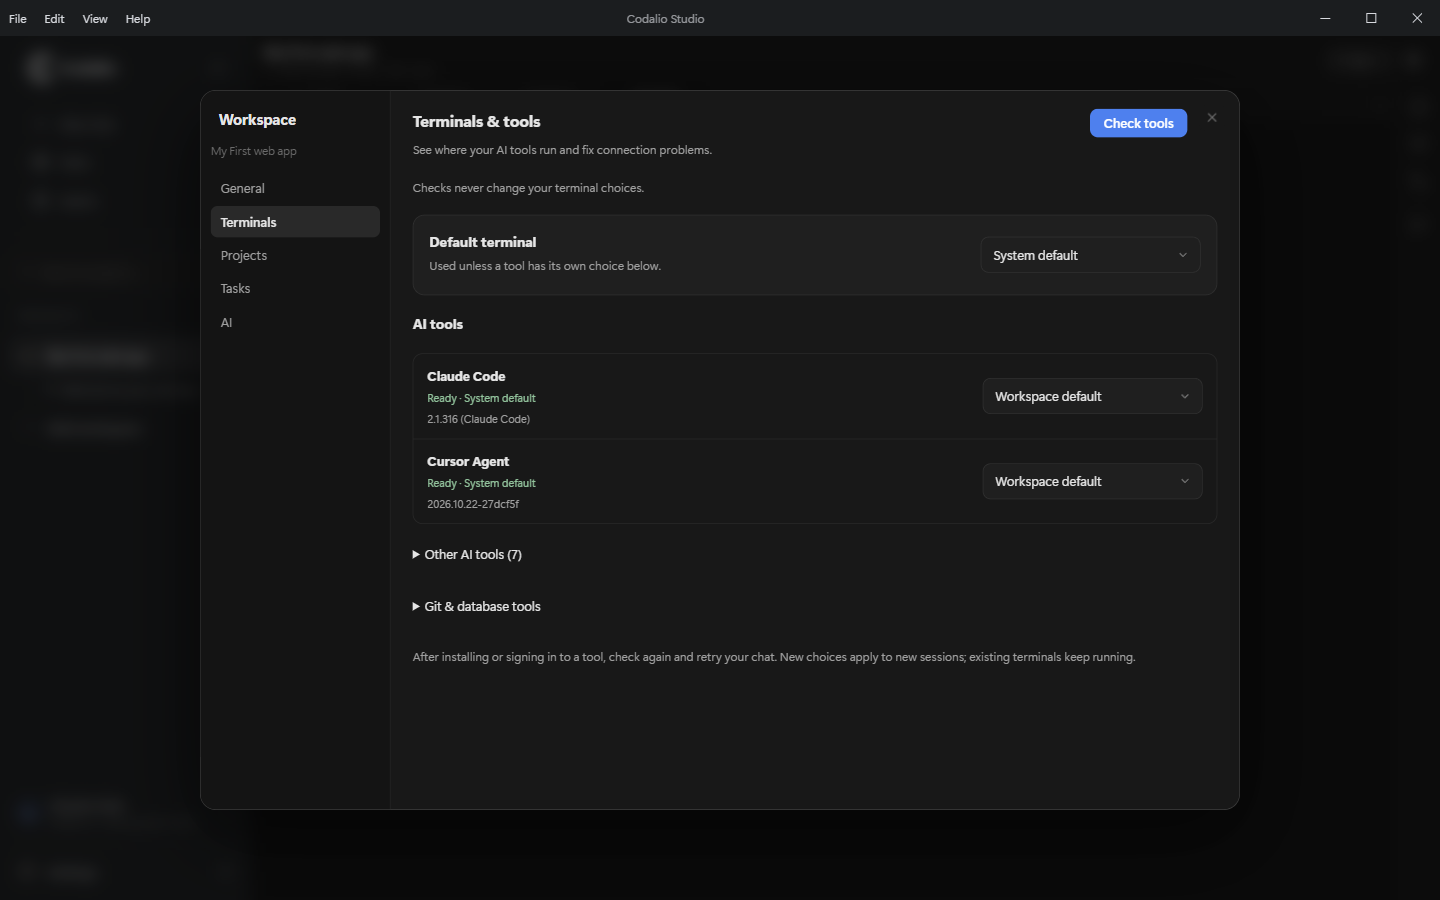
On Windows, a tool can live in Windows or inside WSL. Studio checks each terminal on your computer and uses the first one that has the tool.
To see or change this, open Workspace settings and choose Terminals. Default terminal applies to every tool. Each tool under AI tools can have its own choice. After you install or sign in to a tool, click Check tools.
Start a session
You can use a tool three ways.
An AI session. Click + in the tab bar to open New tab, then choose AI session.
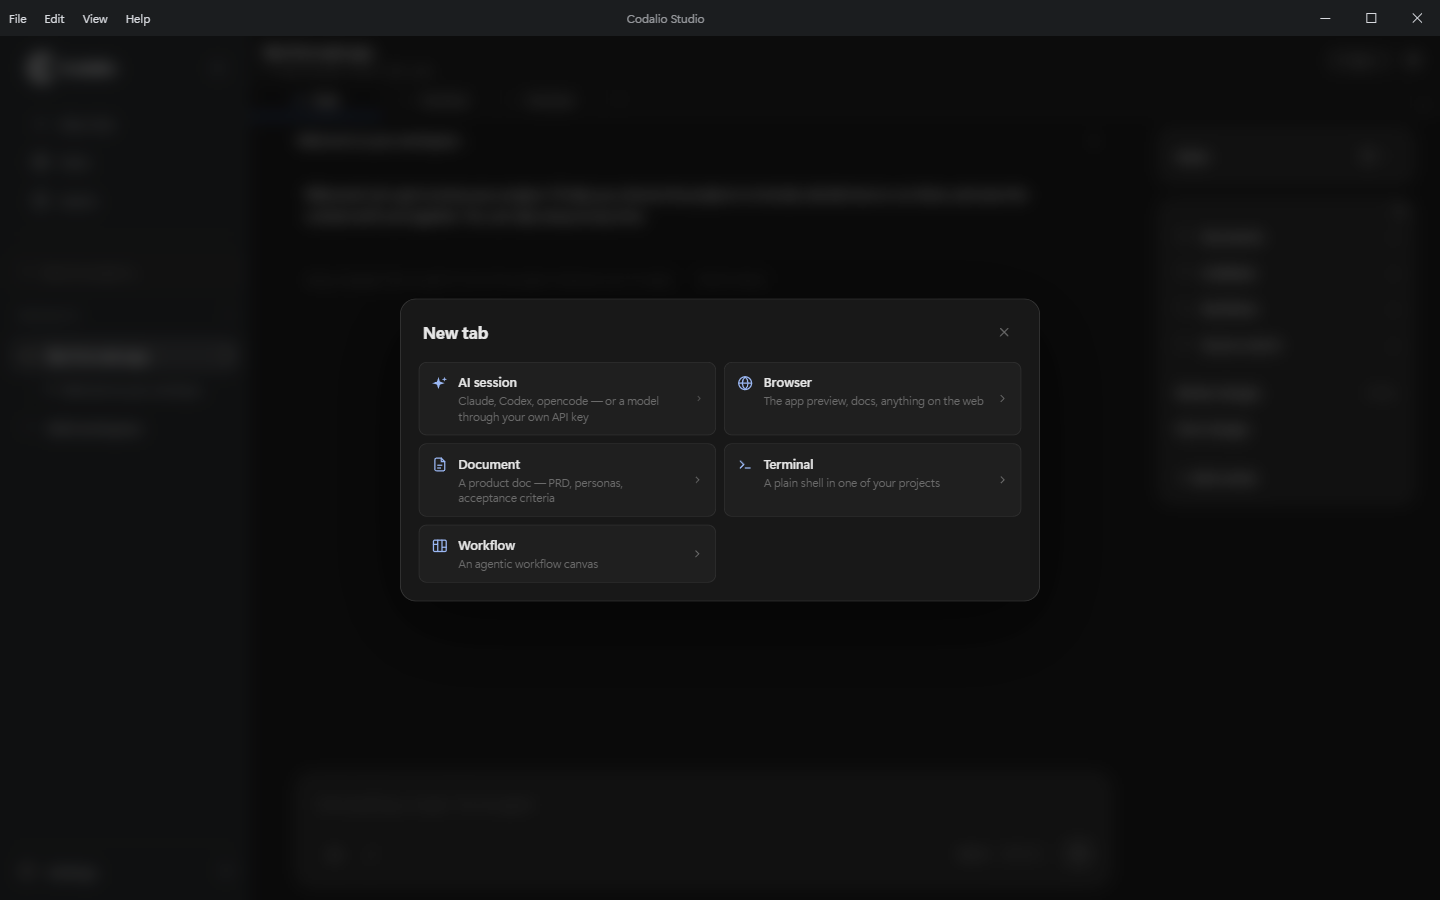
The picker lists the tools found on your machine, with their versions, and the providers you can use through your own API key. Choose one and click Start session.
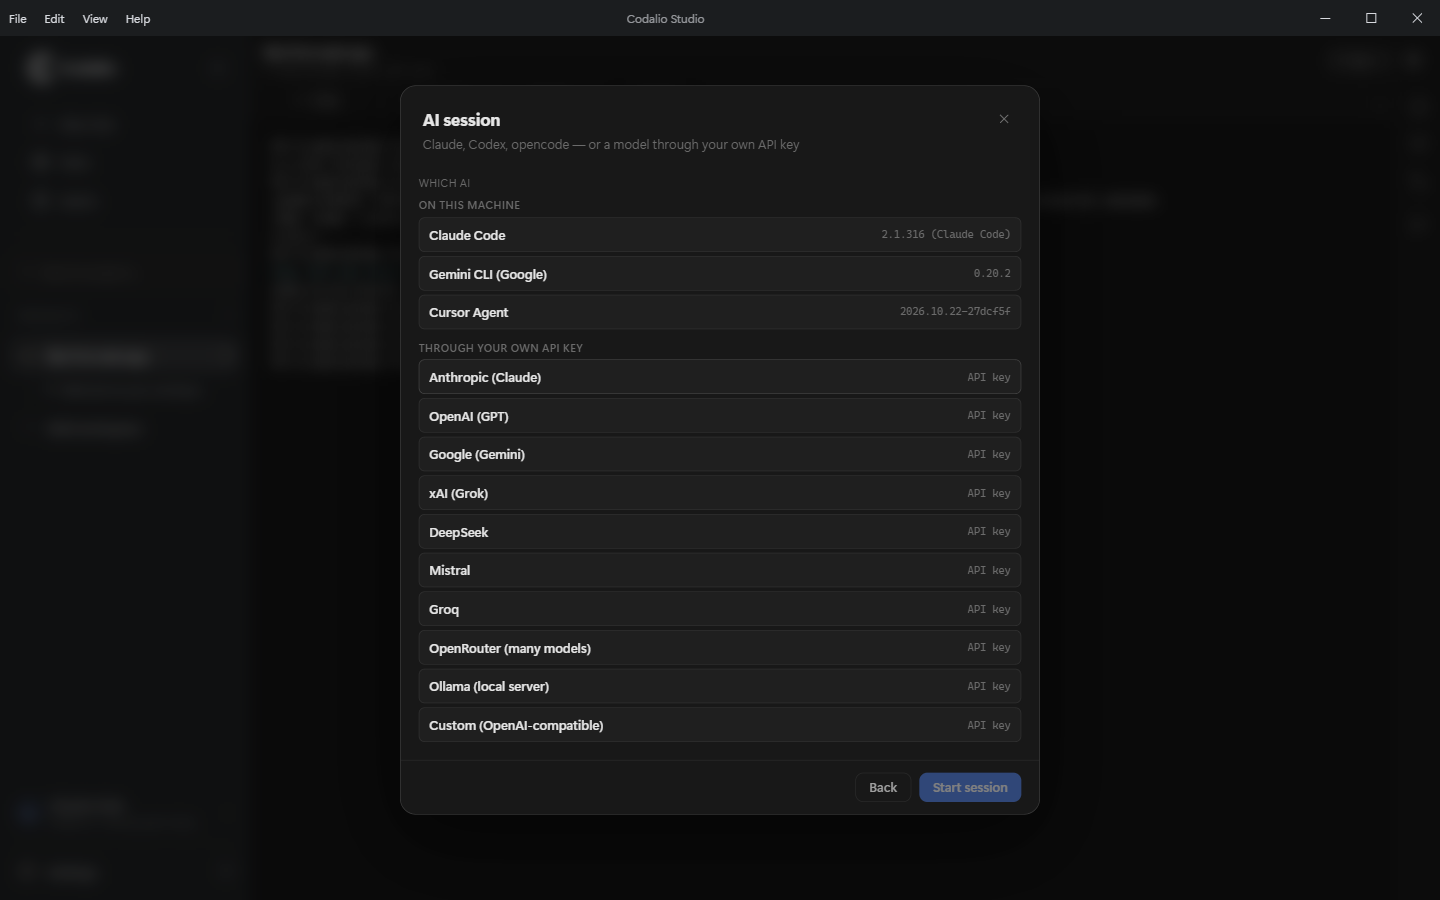
The chat. Type in the chat box at the bottom of the workspace. Type / to call an agent.
A terminal tab. Choose Terminal in the New tab dialog, pick a project, and click Open. Run claude, gemini or cursor-agent as you would in any terminal.
To connect Cursor or Claude Code to the PRD you wrote in Codalio, see Connect a coding agent.
Troubleshooting
Studio doesn't see a tool I just installed. Click Check again on the setup screen, or Check tools in Workspace settings → Terminals. If it still isn't found, close Studio and open it again so it picks up your updated path.
command not found or is not recognized. The tool isn't installed in the terminal you're using, or the terminal was open before you installed it. Open a new terminal tab and try again. If you installed the tool inside WSL, run the command from a WSL terminal.
The tool is installed but Studio says it isn't, or runs the wrong copy. Open Workspace settings → Terminals and choose the terminal that has the tool, either for all tools under Default terminal or for that one tool under AI tools.
A session says you're signed out. Run the tool's sign-in command from Sign in in a terminal, then retry in Studio.
npm install -g fails with a permissions error on macOS or Linux. Install Node.js with a version manager such as nvm instead of using sudo, then run the install again.
Cursor Agent won't install on Windows. Install it inside WSL with the Linux command, then choose WSL for it under Workspace settings → Terminals.
You can open this guide from Studio at any time: choose Help → Documentation, or click Setup guide next to a tool on the Set up your tools screen.
Still stuck? Contact support.